Hi guys,
I know it’s been a while since I last posted. Have been occupied with other stuff and haven’t found the time to blog 🙁 , though I have been doing a lot of manicures and now have a bunch to post!
Warning: This is going to be a long rambling, picture heavy post. If you’re impatient, or are short on time, skip to the pictures and the final thoughts section!
Disclaimer: Everything was purchased with my own money. I was not paid to write this review and I’m not getting a commission if you guys do decide on buying any of the stampers reviewed here.All the views and rankings of the different stampers are based on my individual perception.
Alright, getting back to the post, today I will be reviewing a bunch of stampers used in nail stamping. When I got into nail stamping at the start of 2014, there were not a lot of options available to me, most sellers were unable to offer tracked shipping as it’s usually more expensive. In fact living in India, I did not want to take the risk of ordering from a website abroad only to have my package lost/stolen before it even reached me ( There’s a high level of uncertainty and tension involved with untracked parcels that I’m not comfortable with).
I remember scouring a ton of Blogs/Instagram Accounts and Facebook to find “the perfect stamper”. This is how I came across the incredible encyclopaedia that is Tamira from Lacquer Lockdown. She is my guru when it comes to anything nail stamping related!
I started off my stamping experiments with 2 stampers – the Konad double sided one purchased off Amazon and the MoYou London squishy stamper (that went out of circulation literally the second after I ordered ).Things were good, the stampers worked well, though there were a few hits and misses with my stamped designs. I blamed this on my relative inexperience.
Fast Forward to Jan 2015 and there was a new kid on the block – The Creative Shop Stamper. It was so huge and so squishy and so translucent and so different looking! Suddenly everyone wanted one! To make it seem like a truly “treasured” object, demand was high and supply was having trouble meeting the demand because these were made in Ukraine and there was no reliable way to pay the seller because PayPal was out due to political problems in the area. Group Buys on Facebook came to a screeching halt when someone didn’t follow the rules.
Anyway as it turns out, this feted stamper sorta had feet of clay. It was difficult to use, and there were a lot of mixed feelings. A few short weeks later the lovely indie plate maker Johanne from FabUrNails released her own version of the squishy stamper. Jump to July and MoYou London have also released a new jumbo squishy marshmallow stamper with two versions – a sticky and a non sticky one.
Is it any wonder that people are super confused? We’re now in the reverse situation compared to 2014. There’s too many options and more cropping up every second and everyone is spoiled for choice.
To bring some clarity to this situation, I thought it high time someone did a comparison of all these highly lauded magical harbingers of beautiful nails. That someone is me. So let’s get started!
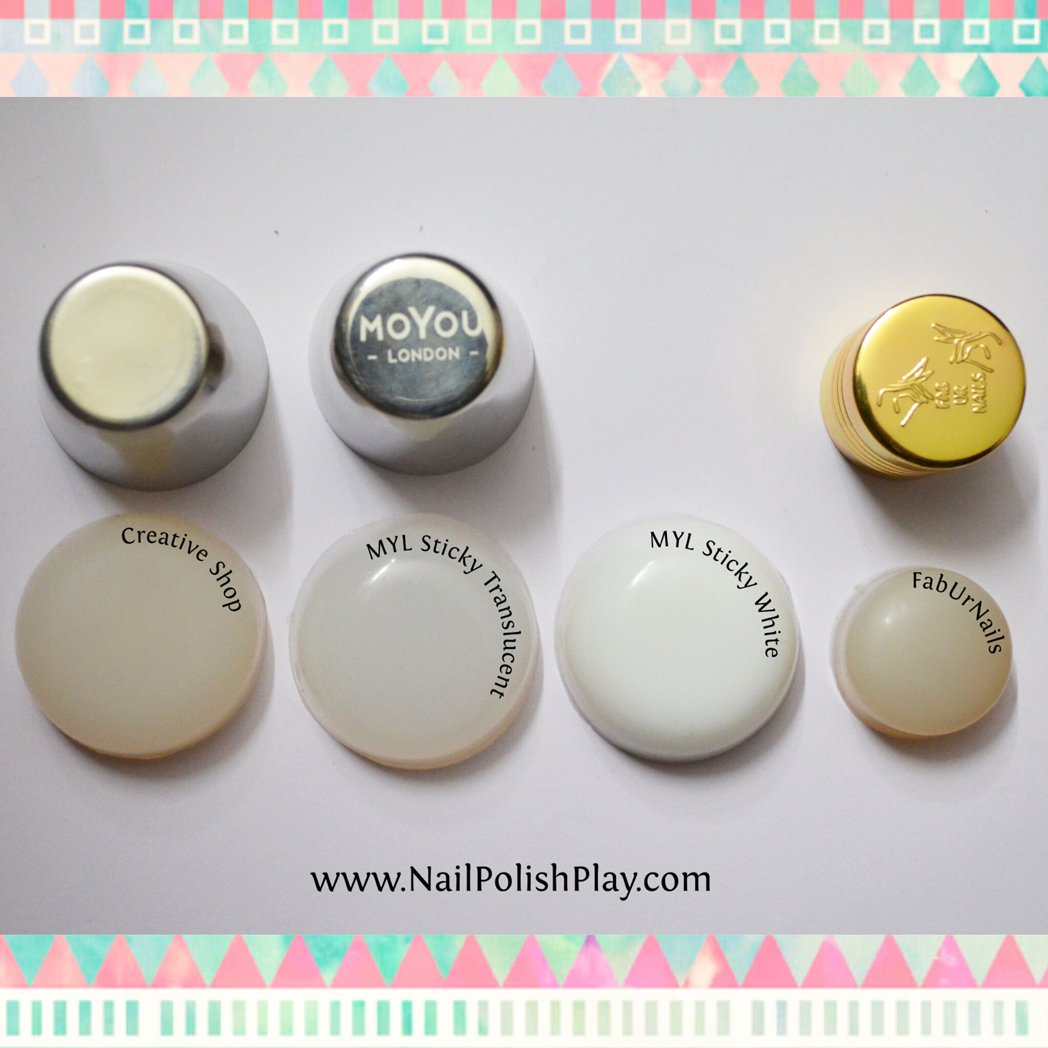
Stampers that are reviewed in the great stamp off:
1. Creative Shop Stamper. I got mine from Rainbow Connection UK for £8.
2. MoYou London XL Squishy Marshmallow Stamper – Sticky Translucent ( I bought the double set, it comes with 2 heads – £9.99)
3. MoYou London XL Squishy Marshmallow Stamper -Sticky White
4. FabUrNails XL Gold Stamper Set ($6.5)
Methodology:
1. In order to judge the stamper fairly, I have tested it against plates from 3 different makers that are more or less ubiquitous.
2. I have two polishes – one is a stamping polish specifically meant for stamping (Konad Black), and the other is a regular polish (NewU no. 86 Red Mistique) that is opaque enough for stamping.
3. I will first showcase each individual stamper with the plate/polish combination. Then I will compare the stampers amongst each other for a single plate/polish combo.
4. I assign a rank from 1 to 4 (1 being Best and 4 being the Worst) to each of the stampers for a single plate/polish combination.Each rank has points assigned to it in reverse order i.e. : Rank 1 has 4 points, Rank 2 has 3 points and so on.
5.The stamper with the most points wins the stamp off!
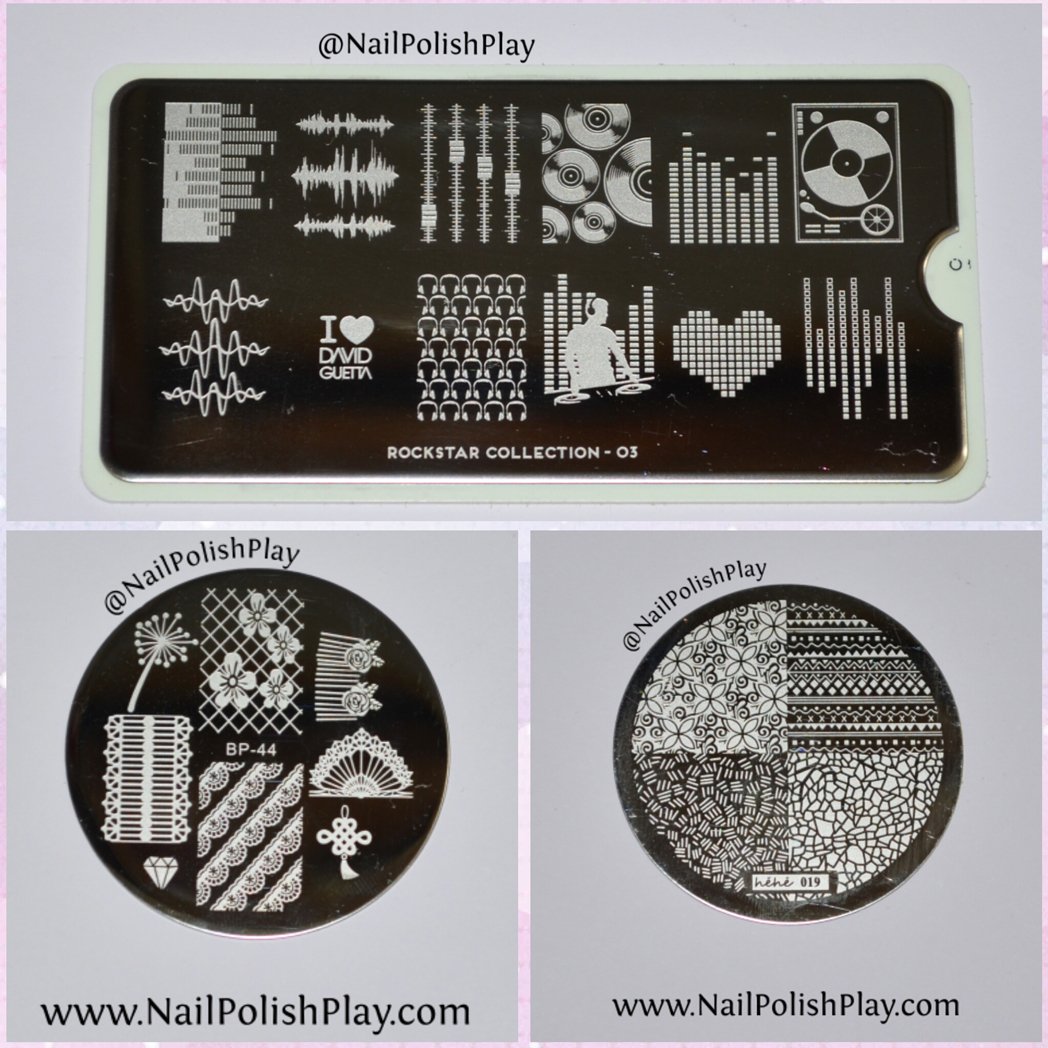
Plates Used:
1. Born Pretty Store – BP-44 . I think pretty much everyone who loves nail stamping has at least one born pretty store stamping plate.
2. HeHe 19 – A stamping plate from Ali Express (This is a dupe of the original HeHe plates). I bought this before the actual maker of HeHe plates made herself known to the world and started shipping merchandise internationally. This company is most famous for their Harry Potter themed plates that you can get here.
Why did I choose a random plate from Ali Express?
Well, lots of girls buy plates from here as a) they are dirt cheap , b) you get a nice variety of them and c)most of them are well etched. The problem is c). Since the etching is a hit or a miss, I thought it would be useful to compare how these stampers all work on a plate with questionable etching.
3. MoYou London Rockstar 3 – I added a MoYou London plate as I was testing the new MoYou London XL Marshmallow Sticky Stamper for the first time. I didn’t bother with a FabUrNails plate in this trial as the etching of FabUrNails plates is excellent and on par with MoYou London.
First Up, Creative Shop Stamper
As mentioned earlier, this stamper went viral when it was launched. It was supposedly the squishiest and the best stamper there ever was.
However, over time, a few negative reviews came out about how it was difficult to use this stamper. The irony here is that this stamper became very popular because of it’s size and then also became unpopular because of it’s size.
It’s quite expensive at £8 (It retails for $8 in the USA and I’ve seen it listed at €8 on European websites). Looks like the number is the same, the currency is the only thing changing! So depending on where you live, you can get it for cheaper depending on what currency you use.
The Good’s :
1. It is a very squishy stamper.
2. Made of a translucent material so that even white stamping polish is easy to distinguish .(This was a very new feature at the time of its release)
3. It’s large enough to make decals for more than one nail in one go/stamp on more than one nail at the same time.
4. It’s soft enough for those with a very pronounced ‘C’ curve to press the nail into the stamper.
5. Very unique design. Kinda appealing to people who have a tendency to collect things. (Not a real advantage, I know, but it’s one of the reasons I don’t hate it as much as others do)
The Bad’s:
1. The holder of the stamper is very slippery. People find it hard to get a grip.I personally don’t, but I’ve heard enough complaints.
2. The image pickup is not perfect. The stamper tends to have a large number of bald spots. This is because of the shape it assumes when it is in the holder. The stamper edges must be inserted to form a dome shape. That way, the number of bald spots will reduce and the pickup becomes better.For more info on the dome shape and how to achieve it, please head on over to Cassis P’s 2 blog posts here and here.
3. Who has the time to fiddle around so much getting that dome shape?!
4. Even after getting the dome shape, it tends to fail. 🙁
5. It may also require some priming despite claims that it works well without needing priming.
Let’s check out how it performed :
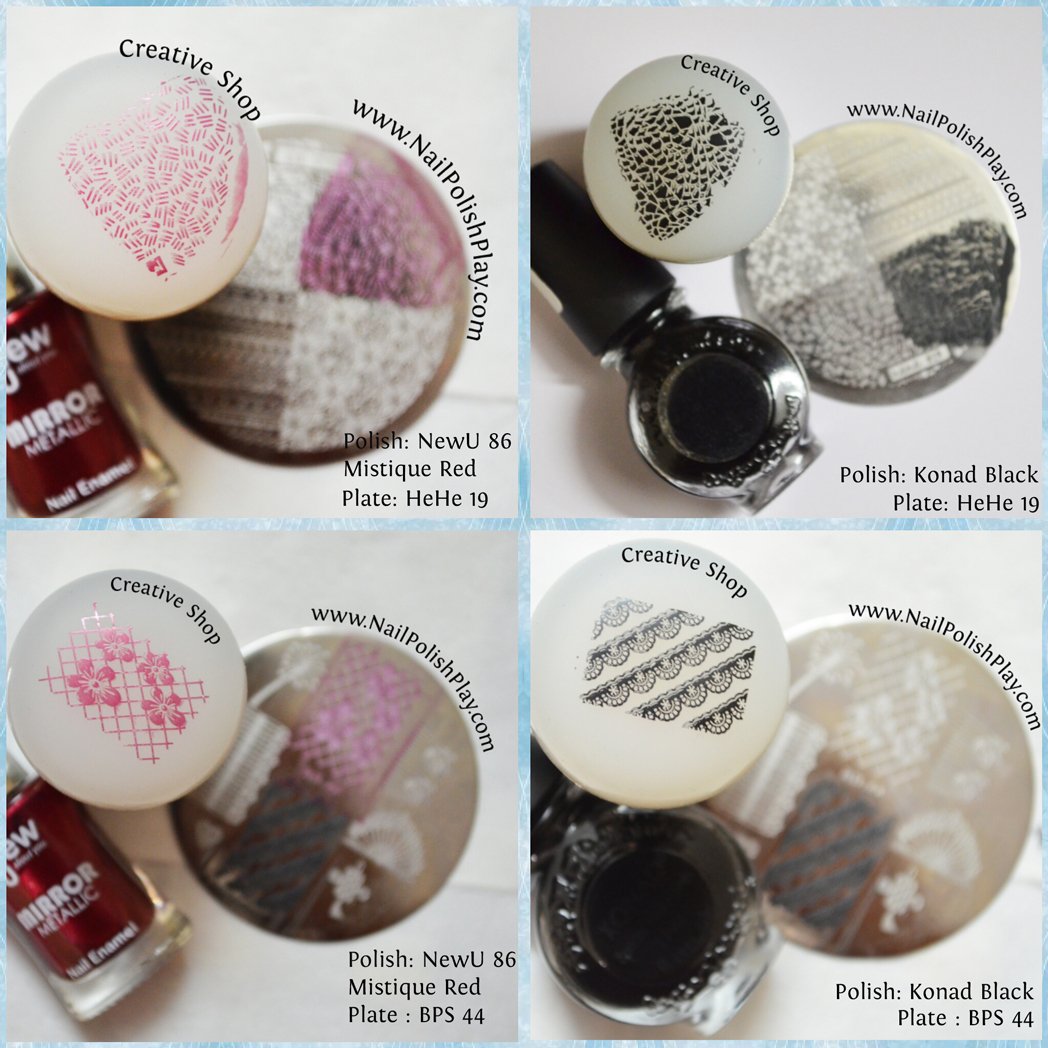
A closer look at the stamped designs:
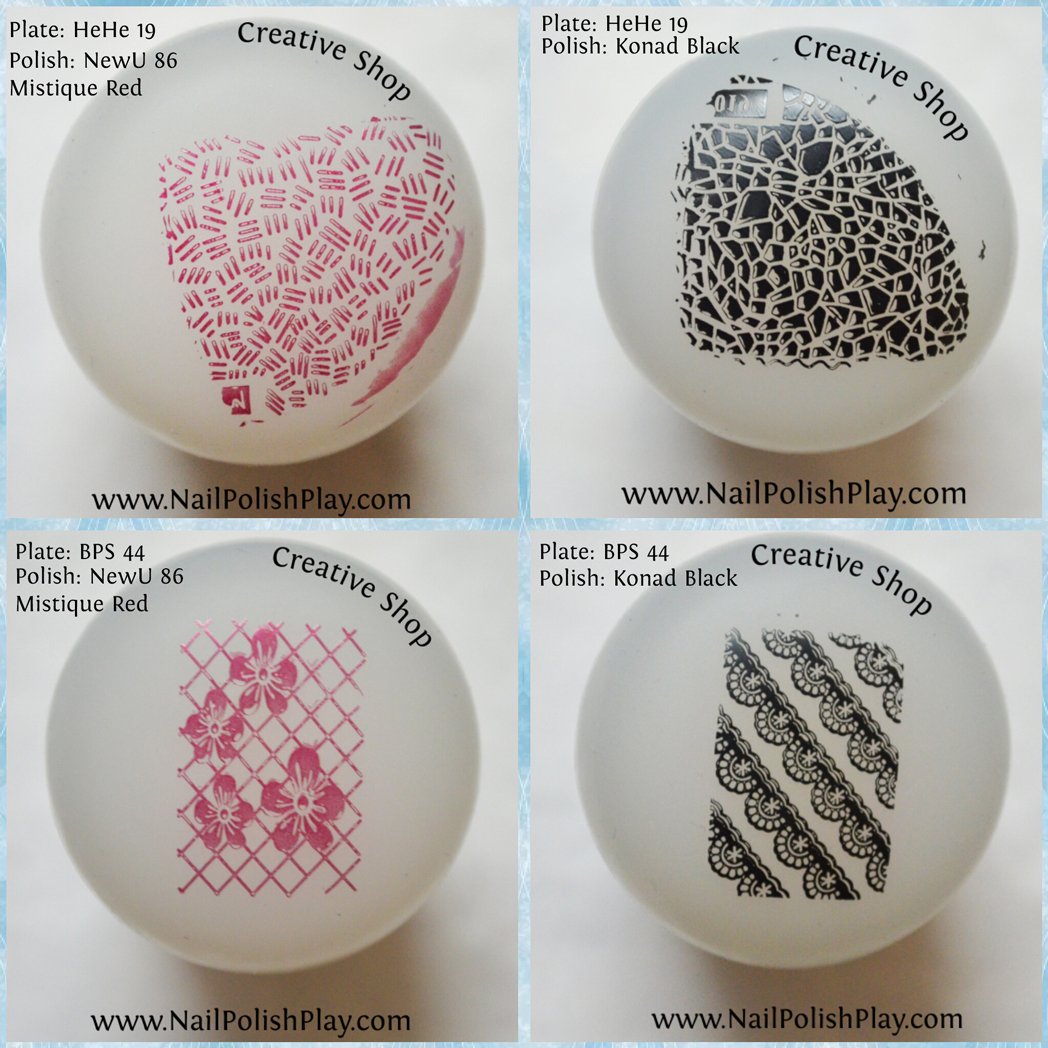
I used a rolling motion to pickup all the images. As you can see, the pickup on the BPS images seem fine. The images from the HeHe plates appear to have a lot of bald spots. As I mentioned earlier, this plate is a dupe and I have my doubts as to the quality of the etching. Even so, the bald spots are bothersome.
You can’t quite say with certainty that the pickup was ‘crisp’ and sharply defined with any of the images above.
Let’s see how it worked with the MoYou Plates:
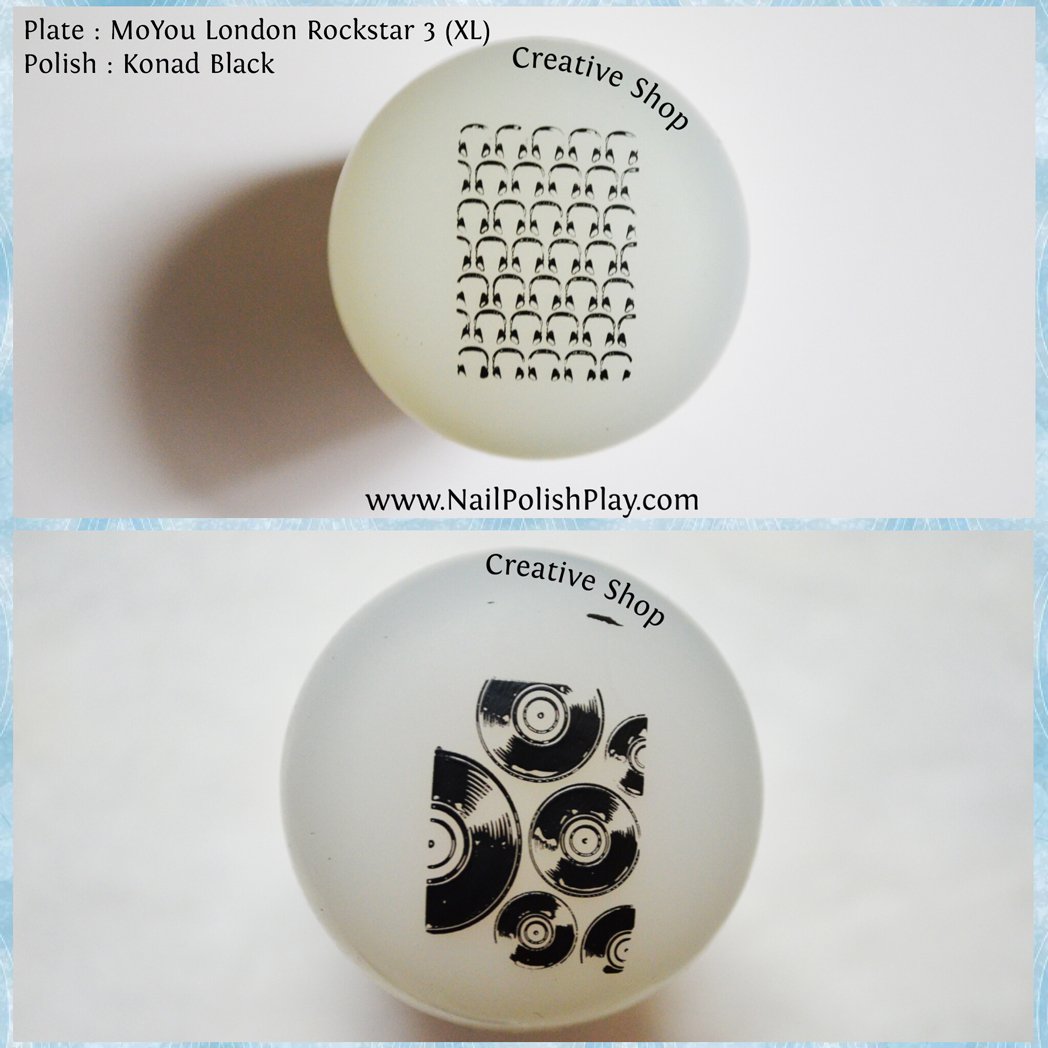
As you can see, even though I have used stamping polish, the headphone image is somehow very very faded. It has not picked up a crisp and dark image the way you expect it to.
There are bald spots in the discs in the image below as well. There is no problem here with the depth of the colour, but the image pickup itself is definitely poor quality.
On the whole a very average stamper at best and considering how much it cost, a huge disappointment!
Contender No. 2 – MoYou London XL Squishy Marshmallow Stamper – Sticky
Now, these are new in the market. They were launched just a few weeks back and there are 2 versions available – a sticky and a non sticky one. The sticky one is supposedly for novices and makes nail stamping easier (Is what the makers claim).
Each type of stamper comes with two heads -one translucent like the Creative Shop stamper, and an opaque white one. Now the level of stickiness and squishiness (if that is even a word) of both the stampers is different.
The translucent one is slightly less sticky and less squishy than the white one. the surface of both the stampers appears greasy when you take it out of the plastic bag in which it comes.
The white one is sticky to the point of getting easily stuck on glass and plastic surfaces. You can turn the surface upside down and the stamper will remain stuck- that’s how sticky this one is. It also attracts dust like bees to honey. When this happens, you can safely wash it with soap and cold water- that will take care of all the dust sticking to the stamper. I’ve tried using a lint roller and scotch tape, the stamper is stickier, so the dust doesn’t come off. Also, please do not use moisturising body soaps, these are enriched with oils that will interfere with your stamper’s pickup.
The Good’s:
1. Sticky stamper. Requires NO priming.Works well straight out of the bag.
2. Kit comes with 2 heads to suit your need. Cost of the kit is ~ £10. Basically you’re getting two stampers and one holder for £2 more than if you’d bought the Creative Shop stamper. That’s a pretty good cost advantage.
3. Individual stampers are also available for £6 to suit your pocket.
The Bad’s :
1. These are delicate darlings. No rough use tolerated. Even the slightest pinch with your nails will potentially tear them.
2. The white one is SO sticky that it’s like a dust magnet! So please store these in a plastic box.
3. A little tricky to get the right knack for using them.
I tried rolling the stamper, but the image pickup was poor. I tried pressing it hard but that also didn’t give me the result I was looking for. Then I tried rolling the stamper and also pressing it very lightly on the plate and I got the results shown below.
Let’s see the results with BPS and HeHe plates:
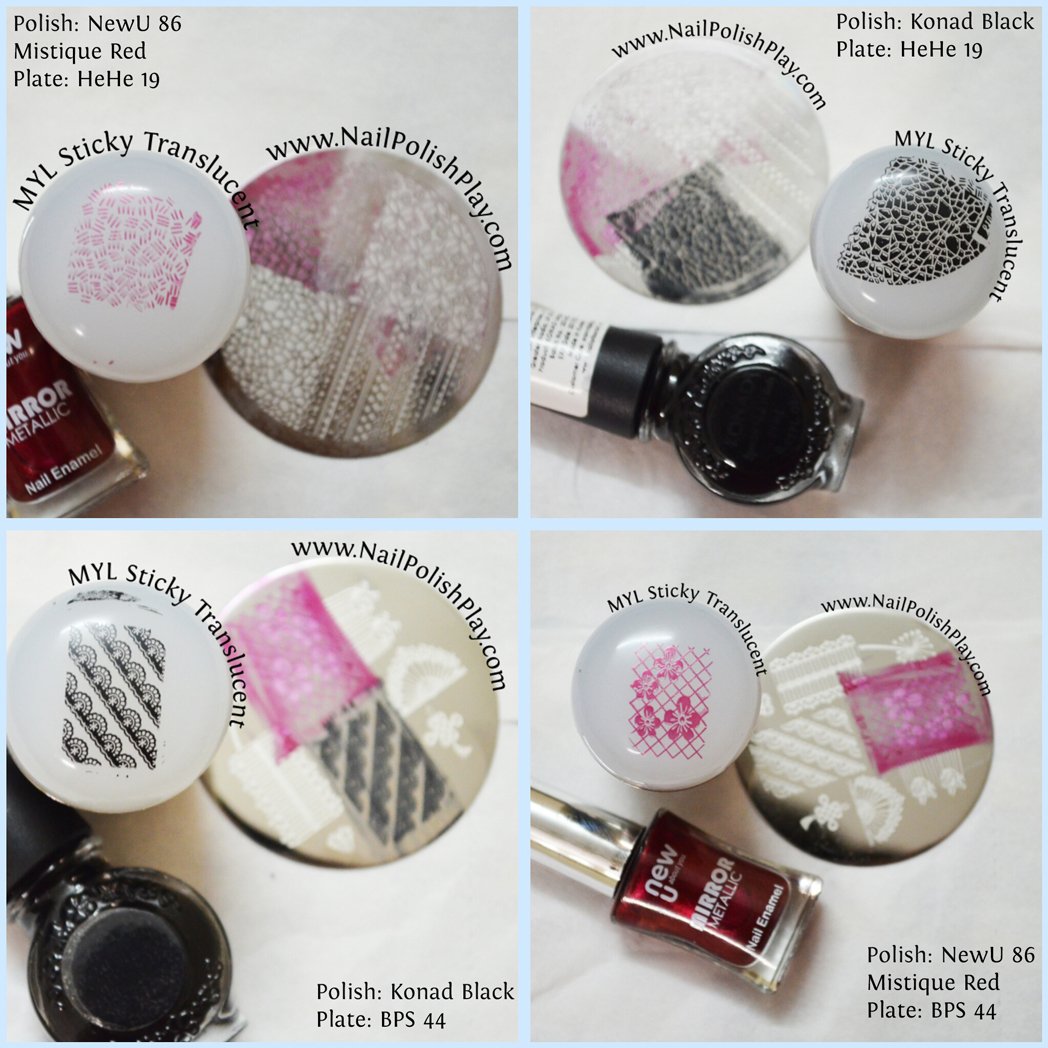
A closer look:

As you can see, the number of bald spots on the images from the HeHe plate are very few.
The lace image from the BPS plate has a very good pickup- crisp and dark and the other floral lattice image has also picked up very well.
Here’s how it worked with MoYou plates:
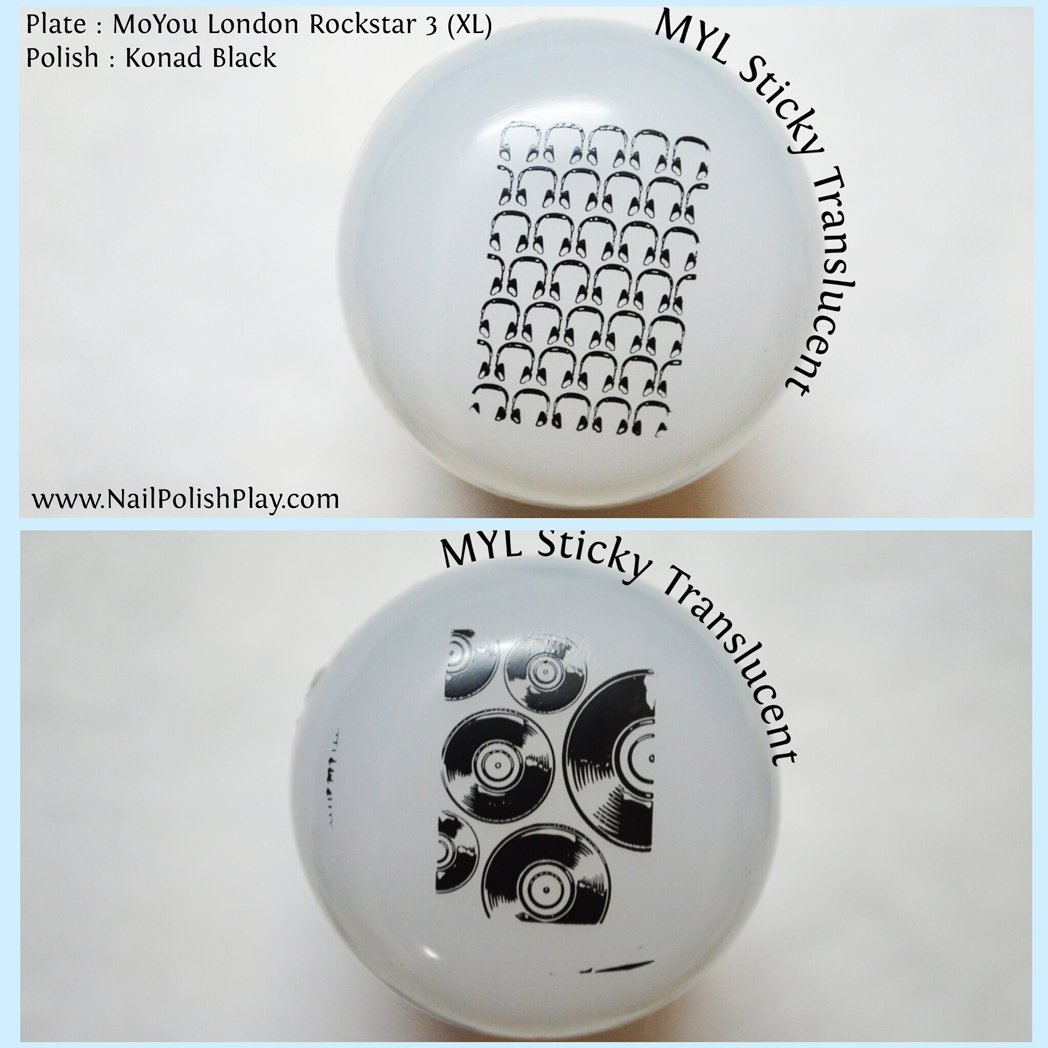
So here, the headphone image is better than the Creative shop one, but can still be crisper. The disc image is good, one odd bald spot, and I think that’s purely because of how I picked up the image. I’m not trying to make an excuse for the stamper, it’s just that I only just got it and need some time to get my technique right.
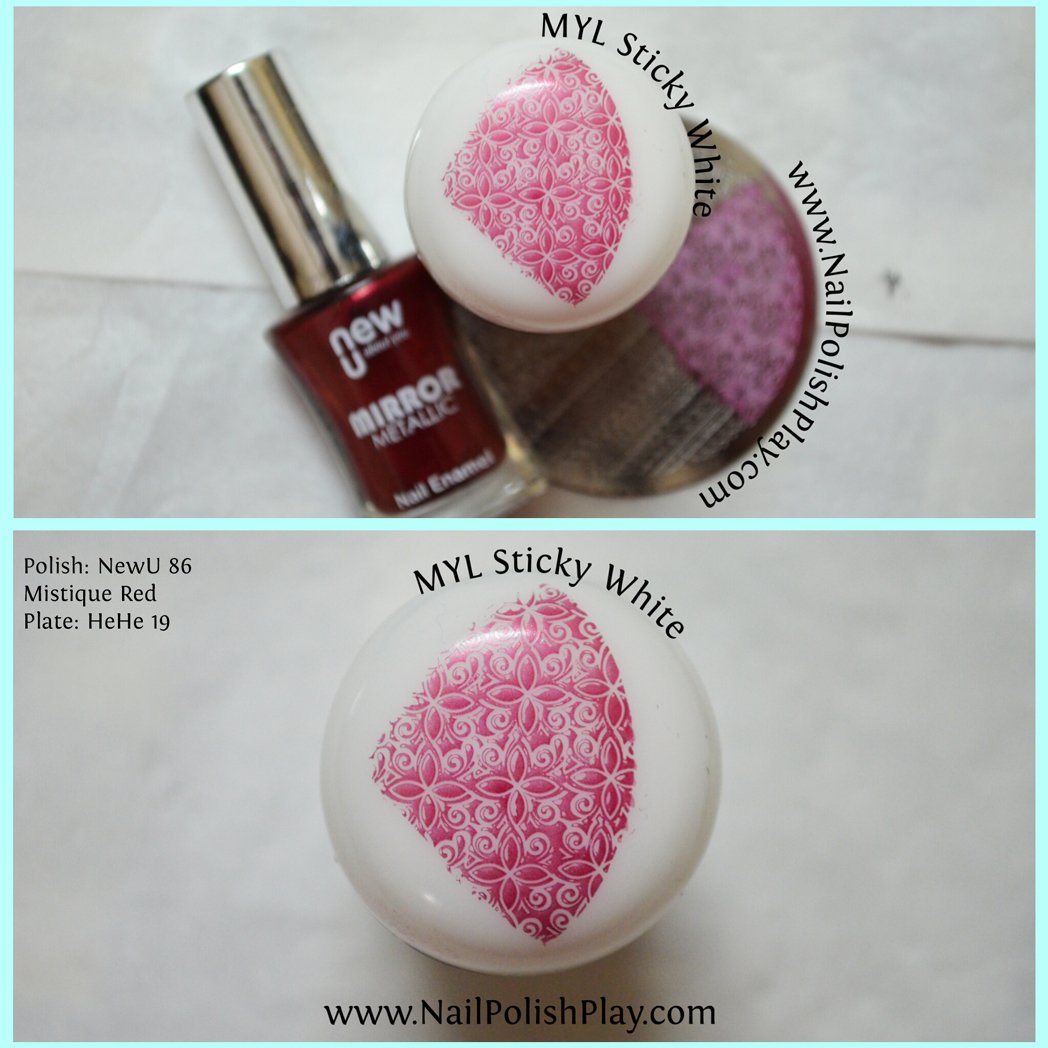
Contender No. 3 – MoYou London XL Squishy Marshmallow Stamper -Sticky White
This is by far the stickiest and squishiest stamper of the lot. It is a true marshmallow as far as I’m concerned. It makes that weird sucking noise when you lift it off the plate after picking up an image.
It is also a tad greasy when it arrives in the bag. However, I’ve found that washing it with mild non-moisturising soap gets rid of the excess grease and does not hamper its performance. Also, if you choose to wash it, please let it air dry. If you wipe it with a paper towel, an actual towel or a t-shirt,these will all leave behind a generous helping of lint.
This one needs careful handling, if it gets stuck on the glass top of the table, gently pry it off bit by bit. Do not hold the “belly” of the stamper and pull, you will seriously risk tearing the stamper. This is also why I store it in a box of it’s own and not with my other stampers as it can stick to another stamper and then separating them may not be possible without tearing off a bit of this stamper.
Having said all that, does it actually make stamping easy? Let’s see.
The Good’s:
1. Super soft, squishy, a true marshmallow.
2. Very very sticky surface that remains sticky even after washing with soap.
The Bad’s:
1. Delicate.
2. Needs a modification in picking up images.
What I mean by modification is this – Simply rolling the stamper may not give you the best result. Also pressing down hard also does not give you a good result.
After some trial and error, I’ve figured out that this stamper is very very sensitive to pressure. You need to use a very light touch and press down extremely gently and then roll it to pick up an image properly. Think of it like giving a very gentle kiss to the stamping plate with the stamper and then slowly pulling away and letting the natural stickiness of the stamper do it’s part in lifting the image ( ha ha, I know , but this is the best description I could think of). So, feather-touch pressure is enough to pickup the image. In that respect, I understand why MoYou called it “easier” to use than other stampers.
Enough Talk, Here’s a dekko at the result :

A closer look:
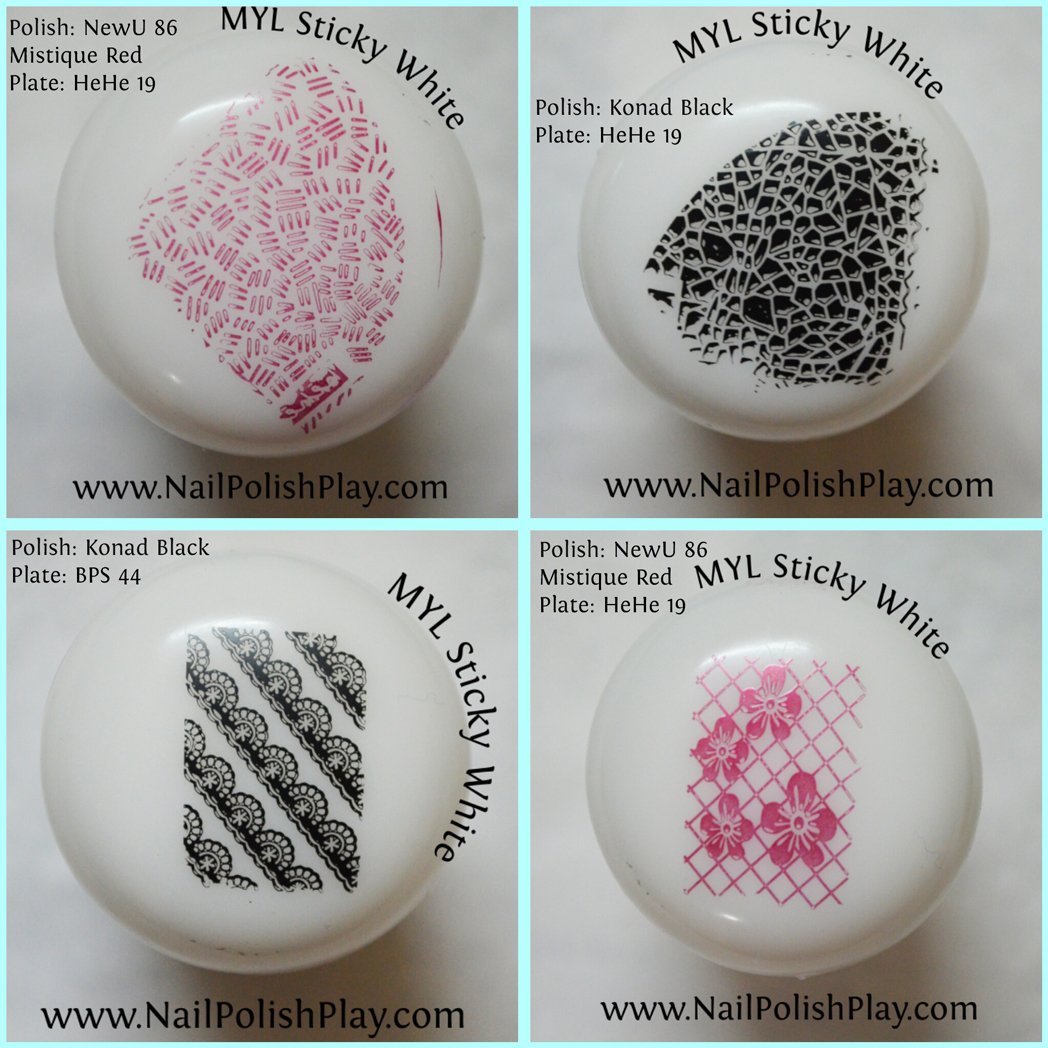
As you can see, the bald spots in the black HeHe image has lesser bald spots. The lace image could do with better image pickup. Once again, I think this is an issue with the way I’ve picked up the image and not specifically with the stamper itself. The red floral lattice has picked up beautifully.
I tried out an extra image with this stamper just to get a hang of the technique, here are the results:
I’m quite happy with how this image has transferred. As I’ve mentioned above, the etching on this plate is not very good so there are going to be bald spots in the image regardless of what stamper you use. So, getting the above result despite that is good in my books.
Using MoYou plates:

I do believe that headphone image is perfect! Crisp and dark as it should be. The disc image seems to have one or two bald spots, though not so much so that the image looks crappy.
I was very skeptical of this stamper when I first opened it. It seemed to be too gooey and sticky to actually work. However, I’ve revised my opinion since then and am quite satisfied with it’s performance.
Final Contender : FabUrNails XL Gold Stamper Set
These have been a long time favourite of mine, I have around 6 of them for making decals and what not. They work exceedingly well. You do not need any tricks to lift the images whatsoever.
The Good’s:
1. Great image pickup, crisp and neat.
2. Available in a variety of colours to suit everyone’s need.
3. No Need to employ any special methods to pickup the image. You can pickup the images either by pressing down or rolling down. Both methods work.
4. The cap holder is very good. It has some corrugations (basically a wave like pattern on the holder) that makes it easy to hold. This is also very useful for making decals as the stamper can stand upright.
The Bad’s:
1.Not sure I’ve found any as such. If you want to nitpick , a few of these stamp well without priming and a few require priming,
Let’s check them out :
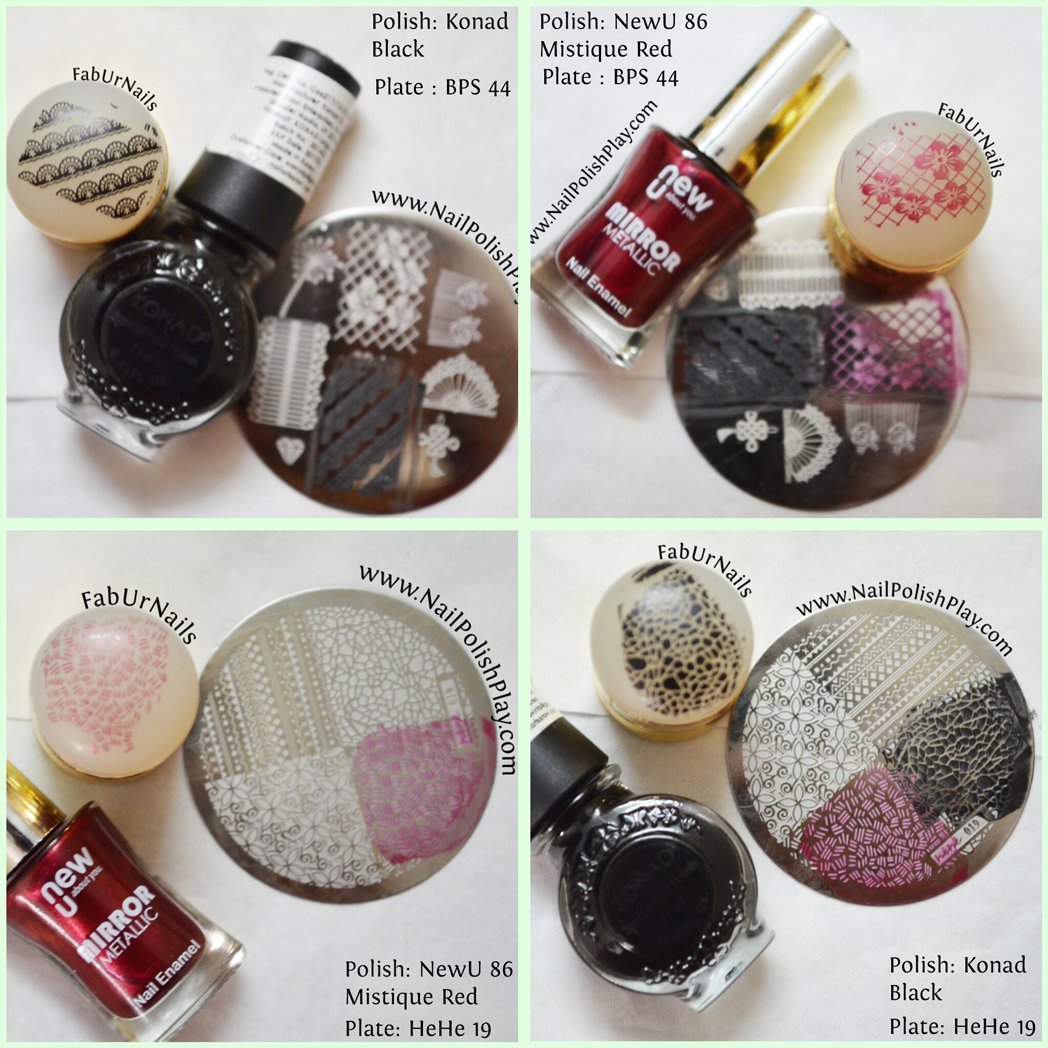
A closer look at the stamped images :
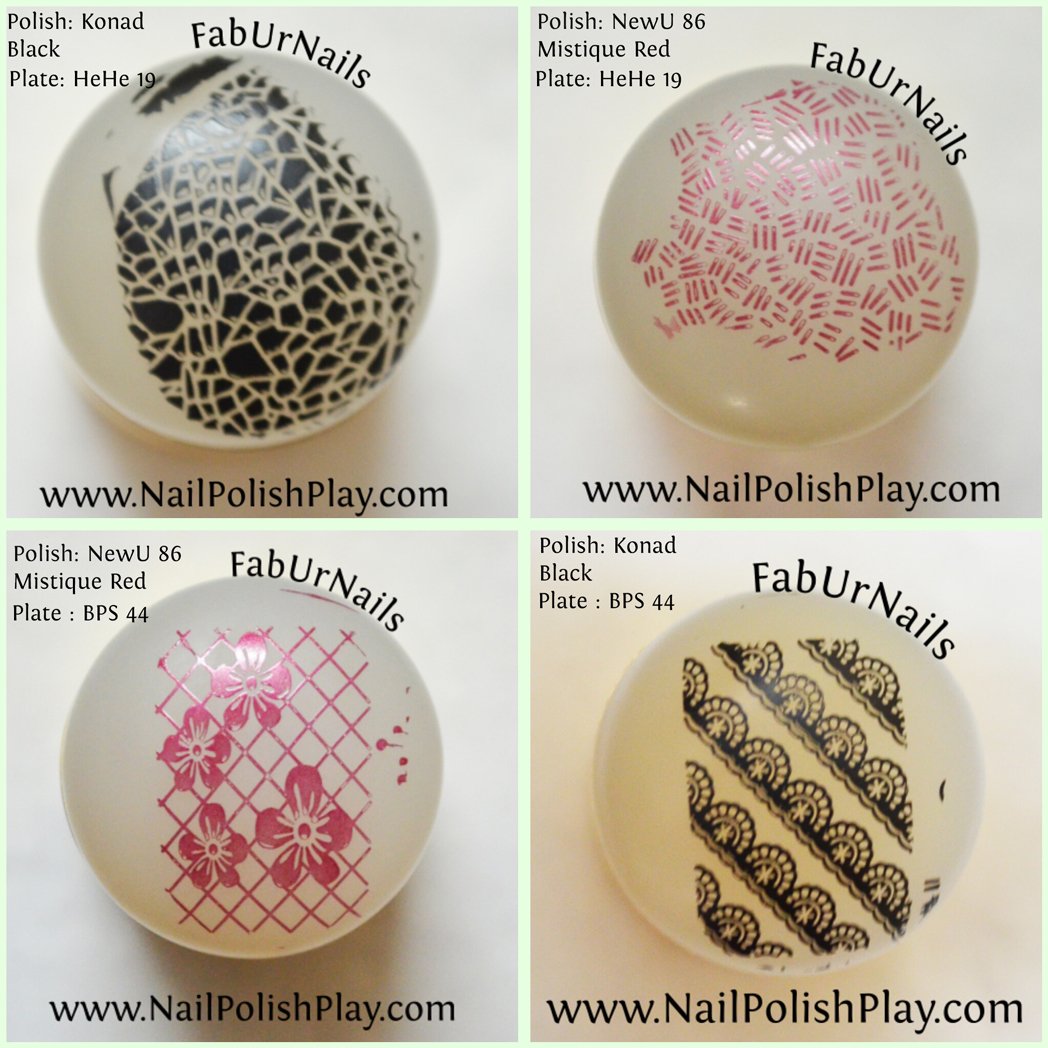
This is what I’m talking about. Look at the drastic reduction in the bald spots! And every single image is crisp and perfect!
Here’s how they worked with MoYou plates:

I’m in love with them all over again! Look at how dark and crisp the images are, an absolute treat to work. I’d highly recommend these stampers.
Comparison of all the 4 stampers:
Let’s compare all the 4 different stampers alongside to get a better and clearer comparison.My criteria for ranking is as follows:
1. How crisp is the image? Does it have many bald spots?
2. How dark is the transferred image?
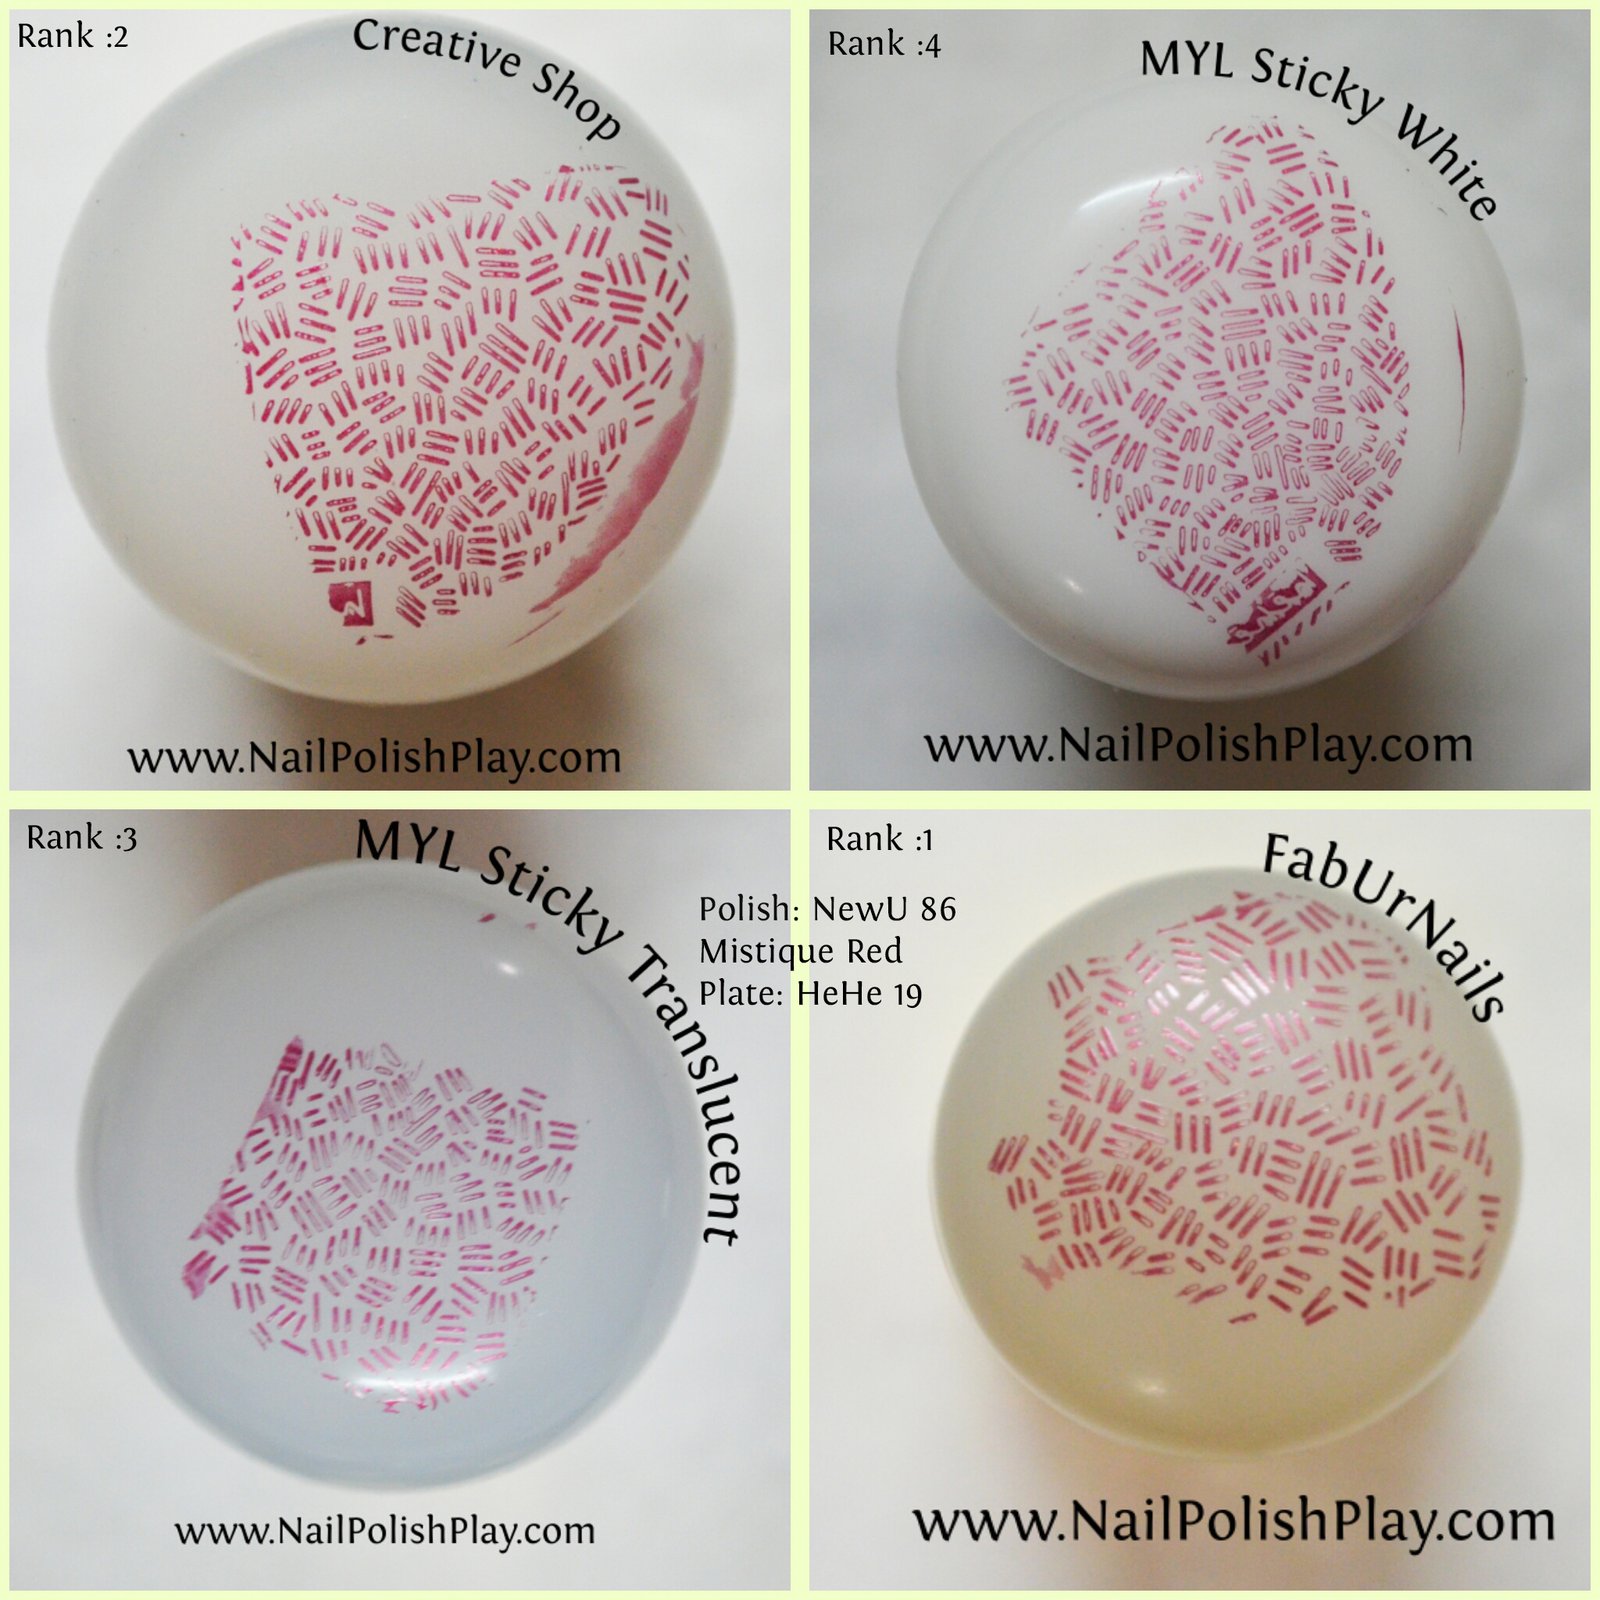
First up, BPS Plates with red stamping :
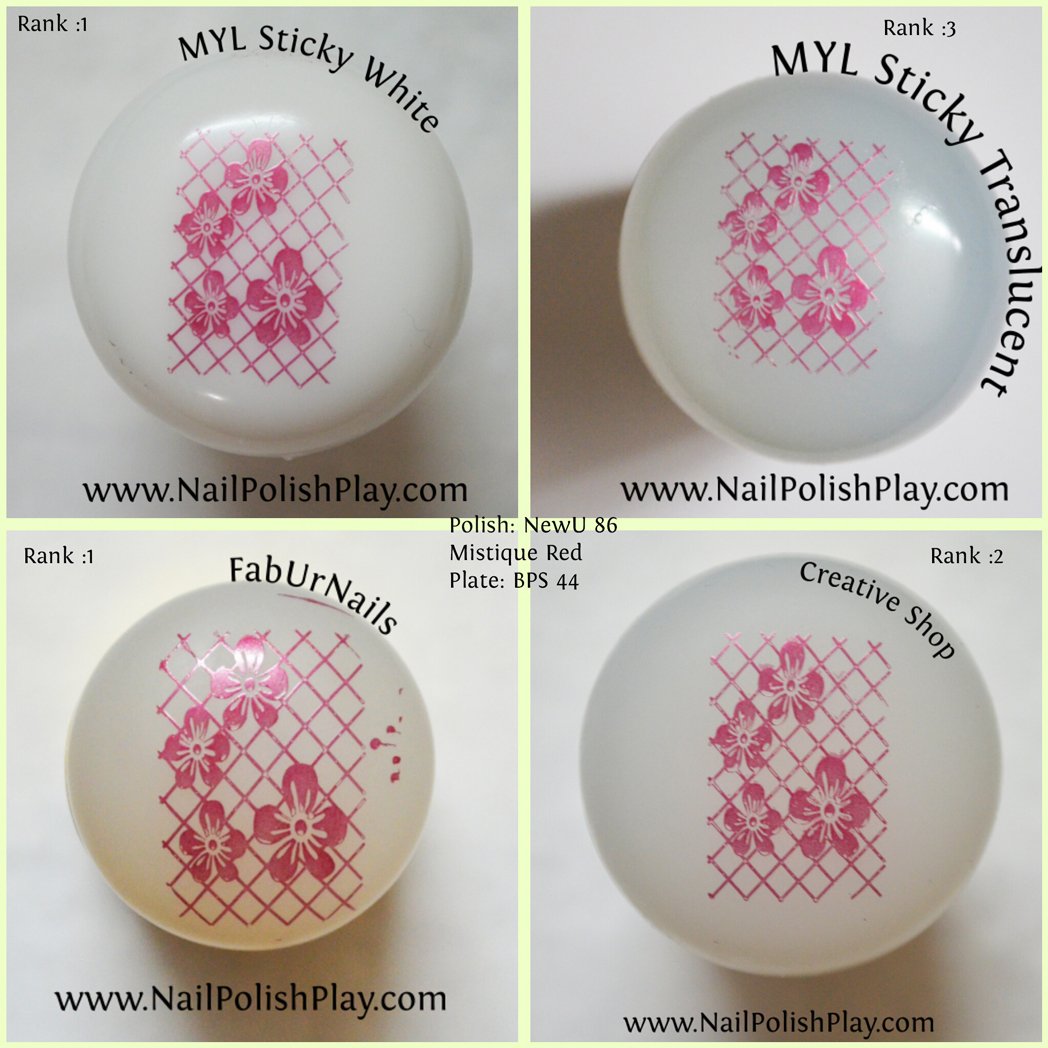
The MoYou sticky white and the FabUrNails stamper are on par with this one- nice and crisp image. The Creative shop stamper comes in second with a few bald spots and in last place is the MoYou sticky translucent stamper.
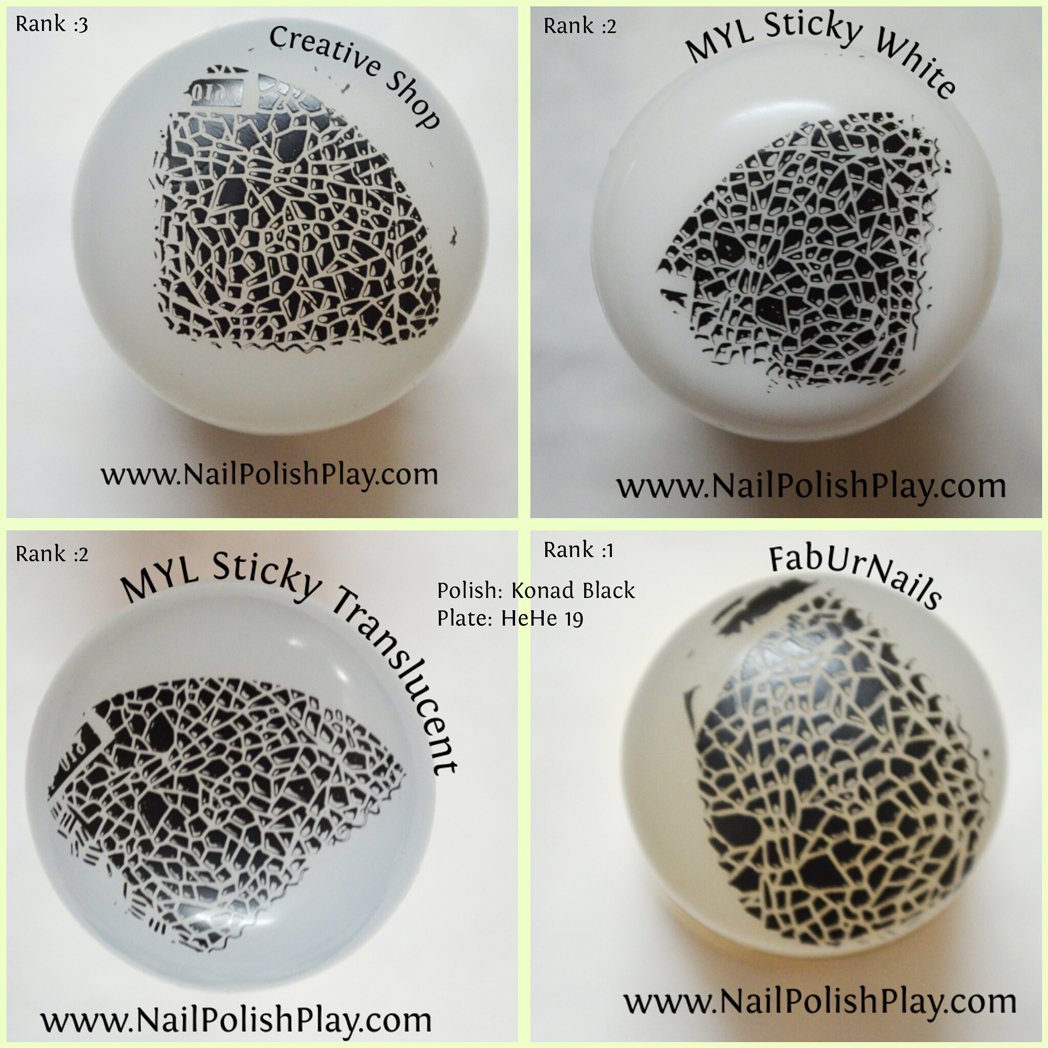
Next up – BPS plates with black stamping:

FabUrNails is the winner here by a very small margin.The image using the MoYou sticky translucent one has a few almost microscopic bald spots that puts it in second place. The Creative shop and MoYou sticky white stamper have almost the same number of bald spots to tie them in third place.
Next, HeHe plates with red stamping:
I think the results are pretty self explanatory at this point I guess. The image design is really good in the FabUrNails one, this is really impressive because of the bad etching in the plate.The Creative shop stamper has also performed well here – the image is quite usable. The MoYou stampers have not picked up the image well at all. Quite a poor pickup.
HeHe plates with black stamping :
The image in the FabUrNails stamper is so good! The bald spots are few and far between. Both the MoYou stampers are at the same level when it comes to bald spots while the Creative shop stamper is in the last place. The darkness and sharpness of images on all the stampers is at the same level, only the number of bald spots are different.
MoYou plates with black stamping :
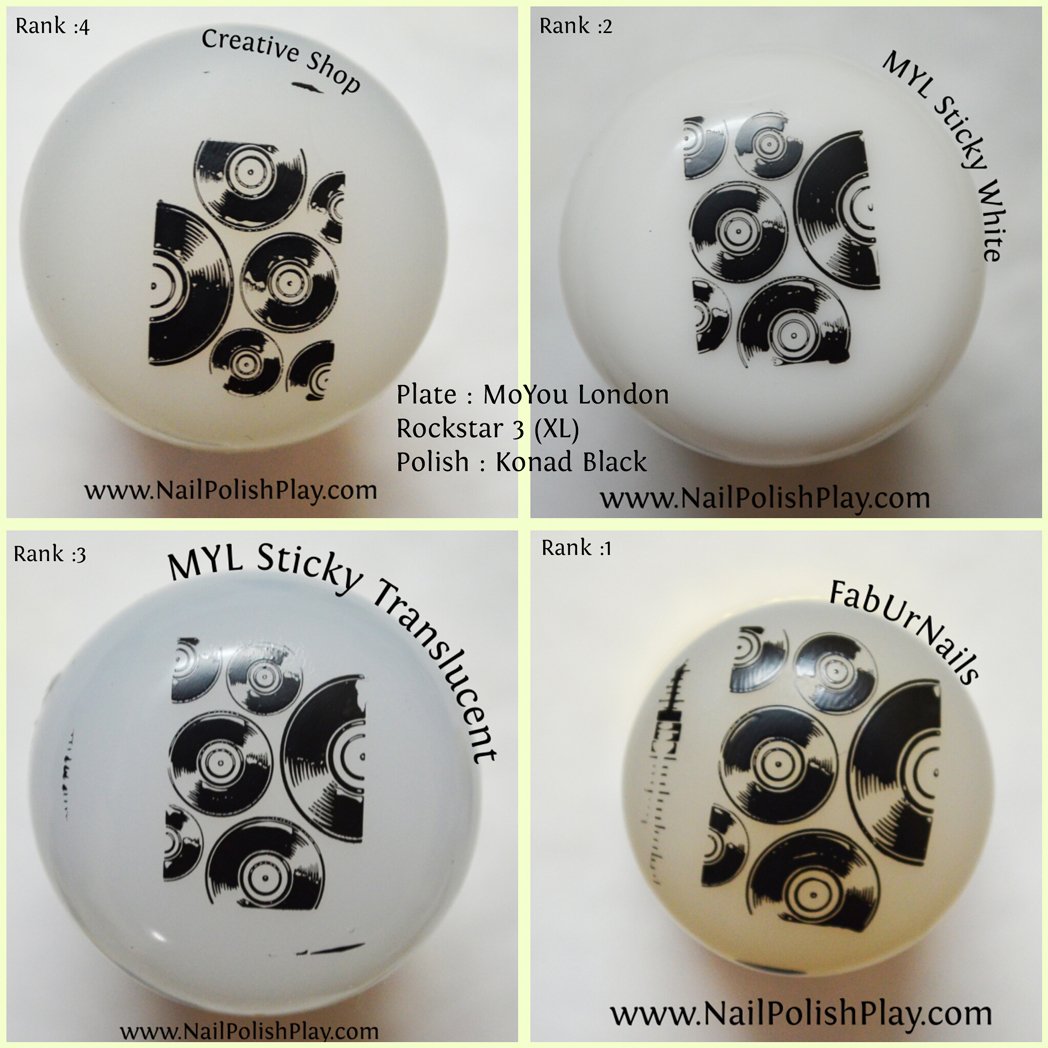
The best pickup is undoubtedly the FabUrNails stamper. The MoYou stampers are in second and third place by a very small margin. I’m confident that I can get a better image on both of them with some practice. I have been using the FabUrNails stampers for the last 6 months after all. Creative shop, sadly is in last place.

Looks like I got my technique right this time, cause the MoYou and the FabUrNails stampers are tied in first place! The Creative shop stamper image is not unusable, though considering that there are other better alternatives out there, it’s in third place.
I made a chart to add up the points for each stamper:
![21.Final_Ranking[1]](https://nailpolishplay.com/wp-content/uploads/2015/07/21.Final_Ranking1.png)
There you have it, FabUrNails XL Stamper is the winner of this stamp off! The MoYou stampers have occupied the second and third place, though I’m confident that I can get them to work just as well as the FabUrNails one. Creative shop sadly was a little better than average :(.
Thank you for sticking till the end, I know this is a mammoth post, there were just so many things I wanted to say!
See you next post!
Follow my blog with Bloglovin