In this post, I’ll show you a mani I created some time ago using my DIY black & white glitter topper.
For this look, you will need :
1. Base coat – Very important to protect your nails from staining and prolonging the life of your mani.I used Sally Hansen Diamond Strength.
2. A pink base -Use any pink polish you like. I used Sally Hansen “First Blush” because it’s a gorgeous spring colour!
3. A black striper. If you do not have a striper, you can use black polish with a thin brush, or acrylic paint too.
4. White polish and a dotting tool ( a toothpick works fine too).
5. A black and white topper
6. Topcoat
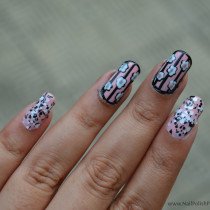
To start, paint all your nails pink. Then, using the black striper, draw vertical lines evenly spaced going from the base of your nail to the tip on your middle and ring fingers.
Wait for this to dry and then trace the outline of your nail on the middle and ring fingers. Once everything is dry, add flowers using white polish and the dotting tool on the vertical lines. Make sure that there’s space between the flowers.
Apply the glitter topper on your thumb, index and pinky. Topcoat once everything is dry.

What do you think?
Leave a Reply to Alpsnailart Cancel reply